Showing posts with label Organization. Show all posts

Saturday, February 26, 2022

Deflecto Room Refresh - a peek into my #Tryazon Party and how I organized with the Stackable Cubes

Complimentary chair mats and organizer cubes were provided to me through Tryazon so that I could share them with friends and through my blog.


One of the things that often brings enjoyment are the unexpected things in life. They don't have to be big or monumental to make a difference, sometimes just the smallest unexpected experience can provide fun and humor to your day. A few weeks ago, I received a text from FedEx letting me know that a shipment was on its way. I couldn't for the life of me figure out what I was expecting, and from a small town in Ohio nonetheless. My husband were sitting down, relaxing, catching up on some episodes of Aerial (enjoyable and education series if you haven't watched it) when the text came in. We sat there and racked our brains. We checked the websites for typical retailers and shipment e-mails for special items that we had ordered recently. Nothing matched. The small town happens to be near some of our friends, so he reached out to say, we are getting a package from that city, any chance they know what is coming? Of course, they didn't but their curiosity was piqued. Let us know when you get it, they asked. Of course, it didn't arrive the day it was supposed to but when it did - we shared the unboxing with them. We had a good laugh about it and they were the first to see the products that I had received as part of my Deflecto Room Refresh Tryazon Party.

Turns out that first shipment was only a partial shipment and there was a delay with the other part. That didn't stop me from partying but it did lead to me have to break the party up into a couple of different 'parties' instead of what I had planned, since the product wasn't all here in time.

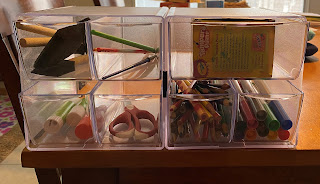
I took advantage of a planned visit from an out of town friend to share with one group of friends about the product, I grabbed the samples I did have and headed out to hang out for the afternoon. Most of our day was focused on catching up but made sure to find time to share with them. I snagged examples and images from the party guide and website to share to show them the organizers in action. We talked about how versatile they would be in the kids room to hold art supplies. Combining the two drawer and four drawer units, clipping them together so they stayed together, was a great way to do just that. The smaller drawers worked perfectly for markers and pens and paint brushes, the larger drawers for paints and small stencils. Also, isn't it nice how the full drawer pulls out making it easy to access the right color too! We also talked about using the chair mat under the art table to help protect the flooring from any paint spills or other art mishaps. My friend with the youngest kiddos wasn't able to join us but I did tell her about the mats and how they work great under a high chair too.

When the rest of the product arrived, I set up for an 'around the house' party. I decided that I wanted to showcase the product in action. Since I had to move the party, I went with an open house style, to allow people to swing by when they could. It wasn't the gathering that I had planned but it was great and I got to spend time with everyone.

The art table:

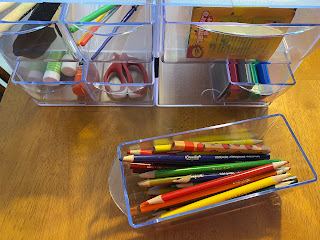
When I was setting up, even though my art table has long been in storage (they just use their desks when they are doing something creative), I went ahead and filled a bin like I had discussed with my friends to share with others.
The kitchen:

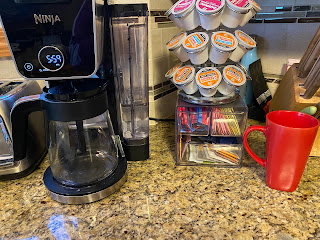
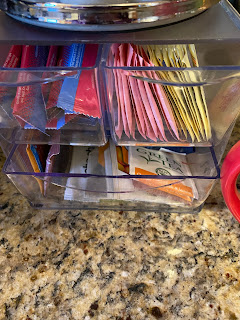
In the Kitchen, I decided that the Deflecto Cubes were the perfect option for storing coffee and tea and associated supplies. I initially toyed with storing k-cups in the drawers but then decided that sweetener packets, drink mix and tea was a better combination. My k-cup caddy was able to easily sit on top of the unit, letting me store more in a small space. I also discovered that I could exchange drawers between sets - giving me two small and one large drawer in the unit.
The home office:

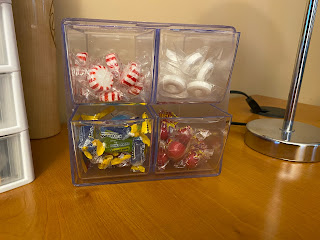
Who doesn't like to keep something sweet at hand. At our house, we do a mix of sweet and minty hard candies and the Deflecto Stackable Cubes gave me the chance to keep them all easily on hand with out them being in one container.
The homework/study desk:

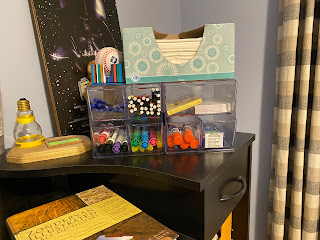
Whether the desk in the bedroom is used for school or work, keeping it stocked and organized is helpful in providing a good environment to learn or complete that project for work. Here we again swapped some drawers around and used it to store pens, highlighters, dry erase, post it notes and more.
The bathroom:

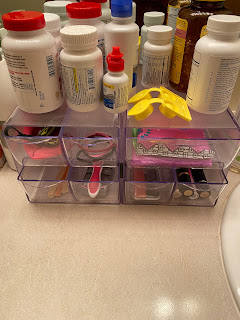
One area that seems to be ever overflowing with small stuff, the bathroom counter was where I put to use a couple more Deflecto Stackable Cubes. Mix and match on the drawers was a great way to store the items of differnt sizes. The top makes a great space for those vitamins and pain releiver bottles too.
The computer desk:

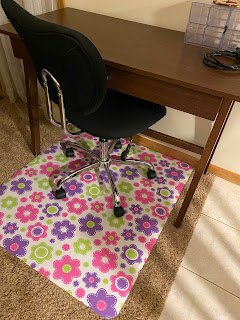
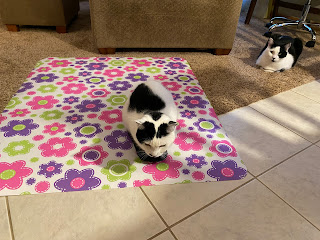
My kids are older, so the floor mat works best in my house for the computer desk in the family room. It provides a pop of color and an easy way for the chair to roll at the desk. As you can see, I had some assistance from the cat in flattening it before placing it at the desk. That's an empty organizer on top of the desk there, perfect location for me to stock some pens and pencils for the desk and some candy too since it is often a place to game.


As I shared with friends about the product and the versatility, I shared some cubes and chair mats with them so that they could try them out for themselves. My friends shared with me how they decided to use their Deflecto Stackable Cubes that they took home. It was great to hear about other uses for the organizers - use in the camper to hold miscellaneious supplies neatly in the cabinet. Children using them to store their Calico Critters accessories. A teacher using one on her desk at school to organize desk supplies. A new at home office being set up with a chair mat to provide a pop of color to the room and an organizer on the desk for desk supplies.

Everyone agreed, the use of the product is varied and diverse. The product is well made and everyone liked how you could clip the units together to stack or have them stay together side by side. If you are looking to check them out, you can find them at Walmart, Office Depot and of course online at Amazon too (where I discovered the so many other organizers that they offer beyond the cubes and the chair mats).


No compensation was received for this review. All opinions expressed are my own or that of my family. Complimentary chair mats and organizer cubes were provided to me through Tryazon so that I could share my experience with friends and through my blog, with enough to share some with my friends too.

Wednesday, June 18, 2014

Corraling the Water Bottles and Travel Mugs

One of the challenges that I feel like I face in my house is a place to properly store things. Sure, I can usually find a corner, a basket, a shelf to tuck things away on, but it doesn't always feel very organized to me.

One of the items that have been a challenge to store are our reusable water bottles and insulated travel mugs. Between the ones that we have purchased overtime - with filters/with chilled cores/insulated/fits the bike cup holder/for coffee and the ones that we have gotten through different events - summer reading club/sports/store events/vacation, we have more than our fair share of reusable water bottles. On any given day, several will be occupying the dish strainer in our sink but several need to be stored. The real challenge has always been the varying heights and some of them have straws - so even if I had cupboard space, they likely would be too tall for a typical shelf.

We have what is supposed to be a coat closet at the end of our hallway near our garage door. Because of a feeling of lack of storage space and a desire to have some semblance of order, it has become more of a storage closet. It is where we keep our vacuum, we have two hanging shoe organizers, there is a shelf unit that holds our winter gear, my spring form pans, a roasting pan, my cookie cutters and up until a few weeks ago our water bottles.

Their perch on the top shelf always felt like it was one bump away from having several water bottles come clattering down to the floor.


Then, as I was wondering the web, as I so often do, I randomly came upon the idea of using an over the door shoe organizer to corral water bottles. I loved it. So, the next time that we were at Target, I picked up this inexpensive over the door shoe organizer and set out to organize my water bottles and travel mugs.

My hall closets and pantry all have bi-fold doors, so they weren't options for me for hanging it, so I settled on the back of the laundry room door. It keeps them out of the way, but still readily accessible, just a few steps from the kitchen.

I really am pleased to be able to store 24 water bottles and travel mugs out of the way. The crazy thing is, I still have 4 or 5 in my kitchen - the one I take each day to the gym, one for each of the kids to take to their near daily sports practices or games and summer camp, the one that I take coffee to work in each day and one other for those days when we have back to back sports and need more than one water per child.

In addition, now I have regained a shelf, plus some random other space where some additional mugs were tucked away, that allows me to better organize other things.

This post shared at Works for Me Wednesday.


Wednesday, August 7, 2013

Back Seat Organization

As the kids have gotten older, one of the things that we always struggled with was keeping the back seat of the car organized when we take trips (even the short ones where we don't go but an hour from home!) I wanted to make sure that they have a variety of activities at their fingertips, but don't want the stuff to be floating everywhere and getting stepped on.

A couple of years ago, as we were preparing to head out for a 16 hour drive to Walt Disney World, I knew that I had to find a solution. I decided that the best thing would be some of box that could work like a file box. It took me a while, but I found the perfect file box that fit between the two back seats and best of all, it had a lid! It is made at Sterlite and I found it at an office store.
The file box has been a great solution for us. We are able to keep a variety of coloring books, activity books, spiral notebooks, Sudoku books, dry erase boards, a box for pens and pencils, a box of crayons and dry erase crayons and more in the box. The kids will set their remotes or headphones on top of the box when they aren't in use.
And, I can easily clip the lid back on and move it out of the way.

It isn't fancy, but it works for us!

This post shared at Works for Me Wednesday.

Wednesday, November 14, 2012

Organization - One Space at a Time

When it comes to organizing things and getting rid of things, for me, the only way, is one space at a time. There is something so daunting about wanting to even do a full room, let alone a full house. I like to celebrate the little victories...they keep me moving to the next challenge.

By focusing on one space, you can organize and declutter with minimal time investment. If I get done with a space and I still have time, I can choose to move to the next challenge or be satisfied that I accomplished the task at hand.

This weekend, I decided to clean out the utensil and gadget drawer. It had been a while since I gave it a good once over. I decided that there were duplicate tools that I simply don't use because I find one to be easier than an other. I knew that there are only so many measuring cups that a person can use - even during the upcoming cookie season. The last time I had given it a thorough look was when I moved some of my more frequently used utensils to a tool organizer.

As I looked at the drawer, I wondered about how those spoons and spatulas that are in my tool organizer once resided in this drawer.
I started by emptying the drawer. I started pulling out things that I knew that I didn't use. I checked to make sure that things still worked. I had two sets of inserts for a Pampered Chef Cheese Grater - turns out that they must have resized and the old set didn't actually fit into the new one correctly. So, I got rid of those. I had extra sets of measuring cups, so I chose the two nicest sets and removed the rest.

As I was starting to put things back in the drawer, I recognized that a couple of organizing baskets would help out. I made a stop when I ran my errands and picked up a few. I wasn't sure which combination would work best, so I got more than I needed - knowing it would be easier to return than to try to run back out in order to complete the project.

I wound up using three of the five organizers that I bought and easily returned the others while running some errands the next day.

I was able to pull out a small box of stuff that I can donate and I feel like my drawer is back in control. It hold many awkwardly shaped items, so it still may look 'unorganized' but now there is (for the most part) only a single layer and I can find everything easily since things aren't buried.


Works for Me!

You can also see my post on organizing dresser drawers here.


Wednesday, October 24, 2012

Organizing a Dresser Drawer

My kids always seem to complain that they can't find this or can't find that in the drawers. Inevitably, I would go to their room, find their drawer completely torn apart and just under the last shirt that they had pulled out was the shirt that they were looking for.

Another challenge that we faced is that the drawers were very full. It seemed that every time we went to put laundry away, there was no room for the clean stuff in the drawer.

Also, to ensure that everything was worn and not forgotten, I was constantly pulling out stacks of clothes to redeposit the wash underneath. Perhaps this was a contributing factor to my first issue.

I felt like their had to be a better way. And, one day, I found it. Place the clothes in the drawer vertically instead of laying them down.

You will have to take my word on the before, because I did not take a picture.

To make the clothes fit, I folded them in thirds and then to thirds.


I stacked them and then placed them in the drawer, standing up.

Now, when I bring up the clean laundry, I can slide it in at the back of the drawer. The kids can see all of their clothes and don't have to dig through everything to find that one shirt that they want to wear. Amazingly, it also seems that more clothes fit in the drawer.


This new way of putting away clothes works for me and my kids.


Saturday, February 11, 2012

Cook'n Recipe Organizer Software - Review & Giveaway

I love to cook and bake. As a result, I like to clip recipes from just about anywhere I can find them. I have a manilla folder in my desk caddy that is full of assorted recipes that I have gathered over the years that I plan to try. After I try a recipe, if it is worth keeping, I usually have good intentions of writing it down and sometimes I do and sometimes I don't. In the instances where I fail to write it down, I have been known to have trouble finding it or encountering it again and wondering if I have tried it.

Recently, I had the chance to try a new software called Cook'n Recipe Organizer. Cook'n is called a recipe organizer, but as I have started to explore it, I have found it to be so much more than just a recipe organizer.
Cook'n comes preloaded with a cookbook called the DVO.com cookbook. This complimentary cookbook features 'a few of the best recipes from each of the Cook'n titles offered at DVO.com' including several recipes in each of the following categories:
Appetizers
Beverages
Breads
Soups and Stews
Salads
Main Dishes
Side Dishes
Sweets and Desserts
Breakfast

It even contains a glossary of cooking terms.

As you explore each recipe, there is a link to the cookbook from which the recipe comes and through this link, you can purchase the electronic cookbook to be added to your Cook'n Recipe Organizer software. In addition, if you try a recipe and find that it's not quite 'right' for you and you want to tweak the ingredients, the software allows you to change up ingredients and save your version of the recipe. I love this feature. I have notes in cookbooks about changes I have made to recipes - whether there is an ingredient I don't like or I am making an ingredient swap, I can make the change and always have 'my version' of the recipe available to use. In addition, you can view the nutritional facts for the recipe.
But to me, the real value is not in their cookbook, it is in having a way to store my recipes. I have a couple of cookbooks that are the write it yourself style and they work great for me, but having it online is even better. Entering a recipe is very easy. First you choose the cookbook and chapter that you want the recipe to be part of. Then, you enter the name of the recipe, a description (I'm thinking this is where I will note - from Grandma, etc), Servings/Yield, Prep time and cook time information. The next section is for entering all of your ingredients. There are separate columns for quantity, units, info and ingredient. In addition, there is a column for the brand (but more about that later). Because there are a number of common ingredients, measures, etc. the software features an auto-complete feature, allowing you to start a word and then choose it from the list that is created. It makes keying a recipe in go a lot quicker than if you had to type out everything. If you are adding ingredients that are not on the ingredient list, you can do a quick add and then go back and build the details for the ingredient later or you can set it up right away. Then, there is a text box for entering the directions for making the recipes. Once you have entered and saved your recipe, you can add a picture. I am still playing with this one, the pictures from my camera are too large to post, so I need to figure out how to scale them down to a size that works.

In addition to entering your own recipes, you can use the software to help you find a recipe on the web and when you do, you can use it to capture the recipe in the software (includes a link back to the source). It does a pretty good job of capturing the description, ingredients and directions, although I will admit that I feel the need to clean them up when I have done this. Once captured, you can save it to the cookbook of your choice. I can totally see myself searching for recipes and building a 'to try' cookbook. Then, when we have tried them, if we like them, they will get added to my main cookbook or deleted, depending on feedback from the family.

There are limitations to the search and capture feature. It only searches a set of sites. I was hoping that it would be such that I could find the recipes that I have already added on my blog and capture them. They are working towards this type of capability, but it is not there. That being said, there is a still a good amount of sites that it does search. So, for my blog, I tend to do a copy and paste of the directions and descriptions portion and then have to 'manually' enter ingredients. At least the auto complete features assist in this process.

You can also very easily scale your recipes. Cooking a recipe for 12 instead of 8, simply go into Settings, check the automatically adjust recipe and then change the number of servings. All of your ingredients will be scaled to the new number of servings.

Setting up ingredients. There is a lot of power in the ingredients. When you set up an ingredient, you give it a name and enter the plural spelling as well. I have found that the, I need to go to View|Brands and open up the Brand tab to create the brand information for my ingredient. You can simply give it a "no name" type brand as you set it up. When you enter the brand, this is where you get to enter the nutritional information for the ingredient. This is important to do, if you want to use the Nutrition Calculator. In addition, you can enter the location/category for the item and the average cost. After the brand is set up, you can go back to your ingredient and enter the brand and if you wish, mark it preferred.

Nutrition Calculator. Once a recipe is saved and brands assigned, you can click on the Nutrition button at the top of the screen and it will open up the nutrition screen for that recipe. It will take the individual ingredient nutrition information (from the database and/or those that you have entered). It will give you a total nutrition for the recipe. You can also select settings and have it divide by the number of servings to see a per serving nutrition data for the recipe. I love this feature! I have been going in and adjusting the ingredient list to make sure it includes the ingredients (brands) that I normally am using, so that I can get the most accurate information. This makes it so much easier for me as I diet.

Menu plan. Once you have a collection of recipes, this software can also become a menu planning and shopping planning tool. Click on Menu at the top of the screen and you get a form for setting up your menu. You can set it up to plan each meal in a day, you can set it up to plan each day of the week, and can even plan out weeks in a month. You can even plan a meal with appetizer, main dish, side dish and dessert - sure to be a help when you are planning a holiday meal and don't want to forget anything. It is very flexible. You add the labels to your menu by dragging or create your own. Once you have the labels in place, you can add the meals. I love to planning a menu with the recipes there. I don't usually pull out the cookbooks and so there are dishes that we go months without eating.

Shopping List. Once you have built your menu plan for the desired period, you can create your shopping list by clicking on List. This will generate a full shopping list for every ingredient in the recipes that are part of your menu plan, organized by category. Based on the pricing information that you entered (or was pre-populated in the software) for the brands, it will even tell you what the cost for your trip will be. Then, you can customize. Already have an ingredient in the pantry/freezer. Mark it as have it and add extra items to your list. When you mark it as have it, the total cost for the list will be updated. This can be a great tool for budgeting and adjusting menu plans if you need to to better meet your budget. I'm thinking this could be especially true if you are entertaining and going outside a normal weekly budget.

You can print your list, your nutrition, your recipe...whatever is up in your active window. Within print, you have options on how to print the page. You can choose different sizes (4x6 for recipe card, as example), different formats (to printer, as pdf, etc), and adjust preferences like printing nutritional data. I would love to have the ability to be able to 'submit' my cookbook to a site that prints photobooks to print my own cookbook (thinking shower gifts, etc.) I think that I could likely work with the pdf print feature and get it onto a nice color print at a office store and have them do a spiral bound. Again, this is a nice to have feature that hopefully will come along some day, but in the meantime, I am sure that I can find other ways to print it.

Know someone else that has the software, there are even tools to allow you to export/import files - so you can share recipes with your friends. I like the idea behind this feature. What a great way to share your favorite recipes with others.

It will take some time to fully customize and to fully populate recipes, but it really seems to be a great tool for managing recipes, the weekly menu plan and dieting.

You can purchase a copy of Cook'n Recipe Organizer from DVO.com for $79.95. You can download it or request a CD copy. You can interact with them on their Facebook page or check out a video here:


Personally, I am excited to see that they are working on an iPhone App that would sync with the software. What a great way to do my shopping and plan my menu on the go.

Giveaway!

One lucky A Busy Mom of Two Reader will win a free copy of Cook'n Recipe Organizer.
(note: you can sign into Rafflecopter with an e-mail, you do not need to use Facebook)


a Rafflecopter giveaway


No compensation was received for this post. All opinions expressed are my own or that of my family. A complimentary review copy of the Cook'n Recipe Organizer was provided by the manufacturer through a Mom Blog Society opportunity.

Tuesday, January 17, 2012

All In Good Time

For many years, I have been reading Deal Seeking Mom. It was one of the original blogs that I read even before I started blogging myself. So, I was excited to have the opportunity to review her new book All In Good Time, which she co-wrote with Mandi Ehman of LifeYourWay.net.

The book is full of practical advice and many common sense tips. I really like that they start the book off by saying that you shouldn't feel like you need to do everything in the book. It's about finding what works for you and doing. It's about saving $1 or 15 minutes here and there, in order to maximize your time and money.

The book is broken down into what they call "rooms". Within each room, they tackle the most common purchases and tasks and share their tips for saving time and money. The last chapter is about Holiday and Event planning and includes everything from birthdays to weddings. The back of the book is a great appendix that features Homemade Cleaning Supplies, Common Kitchen Substitutes, Pantry Inventory, Freezer Storage Tips, Cooking Temperatures, Seasonal Produce, Necessities for Your..., DeepCleaning Checklists - including what/how to declutter, how to/what to clean, and maintenance of the space once you have it decluttered and cleaned, Internet Resources and Recommended Reading.

I really like that it is full of common sense advice. One example of this is their advice to clean out the refrigerator each week before you grocery shop. Makes so much sense. How many times have you come home from the grocery, only to find out that the sour cream, or the peppers, that you were going to use for dinner are no longer good. Not only that, but it certainly is easier to wipe down half empty shelves than it is to clean a freshly stocked refrigerator.

Many of the tips and tricks that they share are things that I have heard before, but now, they are captured in one easy to reference resource. The organization of the book makes it easy to find the recommendations that they provide on how to save time and money. I love that they recognize that not every method will work for everyone. First, they state in their introduction and then they follow through in the book. As an example, in their section on coupons, they present several ways to organize and maintain coupons including the binder method, the coupon box, and the insert method.

The one thing that I wish this book had was an index.  I find that a quick alphabetical listing makes for a great way to find what you are looking for.  Thankfully, they do include a list of subjects under each 'room' in the Contents section which is in alphabetical order (as is the chapter), so it is a little easier than just 'guessing'.

Whether you choose to read it cover to cover or simply thumb through when you are looking for some tips, this book is a great resource.

You can learn more about the book by checking out the Q&A with the authors from the USA Today. You can also check out the book's website. The book is available to purchase online or in your local bookstore.

No compensation was received for this post. A complimentary review copy was provided by the Publisher. All opinions expressed are my own or that of my family.

Wednesday, January 11, 2012

Displaying Kid's Artwork

I'll admit it, my fridge is crazy full with magnets and papers. There is very little white space.

The side is mostly full of magnets - I must have over 100 magnets on the side of the refrigerator. Many are very useful business cards, but they add up. Many are picture frames. Some are simply souvenirs from trips long ago.

The front of the fridge is where we keep the school calendars, lunch calendars, and newsletters. In addition, this is where the kids proudly display their artwork. It used to be that there were so many pieces of artwork that they would find that the magnet wasn't strong enough to work through the stack of papers. I wanted a solution for hanging their artwork that was neater and still allowed guests to view it all.

Here is what we came up with:

We started with a piece of cardboard and cut it in half. The back of a pad of paper can work nice. Using a hole punch, we punched three holes in the cardboard to align with the holes in a sheet protector. Using three rings, we attached a stack of about 6 page protectors to each piece of cardboard. Then, we used a magnetic clip to attach it to our refrigerator. The kids were each allowed to decorate the cardboard portion of their hanger. Now, when they do new artwork, they can simply slide it into one of the sleeves. Changing pages or flipping through the artwork is easier and I have more white space on the front of the refrigerator (although, many would tell you it is still rather full!).

In addition, the sleeve protectors can easily be moved to three ring binder that we had previously set up to hold favorite artwork and new ones added to the refrigerator.

This works for me!


Tuesday, November 15, 2011

Freezer Meals - What's In There?

One of the challenges that I used to face with freezer meals is keeping track of what I had in each container. I would know what it was when it went in, but over time it would get shifted in the freezer and I would find myself wondering if it was sloppy joes, or chili, or spaghetti sauce with meat.

I found the answer to my problem back in chemistry lab in high school. And, to be honest, I found the answer when I was trying to solve the dilemma of marking bottles - both as I placed them in my freezer, but also as I sent them to day care. (It wasn't until my second child that I discovered using bags to store the milk.) I needed to know when the milk was from so that I could rotate properly in both the refrigerator and freezer. I wanted something that I could easily read, would hold up to refrigerating and freezing/thawing, wouldn't wipe off during storage, but could wipe off later.
For whatever reason, I thought of those black wax pencils that had the paper wrapper and the string that you used to peel the paper to reveal more of the black wax pencil. We used them for marking beakers and test tubes in chemistry. The problem was I could describe it well, but didn't know what they were actually called or where to find them. After some searching, we were able to find them. Turns out that they are grease pencils and/or china markers. They worked wonderful for marking the bottles.

Once I had a couple, I recognized that they worked well for marking my food containers for storage as well. Now, when I have leftovers to freeze or make extra to freeze, I can easily mark what the contents are and when they were placed in the freezer.
Works for me!

This post shared at Works for Me Wednesday.

Wednesday, August 4, 2010

Canned Goods Rack

This is in part an encore post about one of my favorite kitchen organization tools (originally posted in September of 2008):


When we moved into our house a few years back, the one thing that I was glad to gain was a pantry in the kitchen. At our last house, we had used a closet in our basement to store extra food items. Unfortunately, I quickly learned that the wire rack shelving that seems to be used so universally in the pantries and closets of newer construction is not at all suited for holding significant numbers of cans. At least not with the configuration that I have that only has side supports due to the relatively small size of the pantry. To combat this, I found myself organizing my shelves with cans lining the three wall sides and then filling the middle with other "lighter" stuff. Unfortunately, this way of organizing resulted in me double stacking cans and made locating items more challenging. I would lose product in my pantry and find it only after it expired. This just wasn't working for me, there had to be a better way to organize the cans in my pantry so that I could find them and use them on a first in first out basis.

I wanted something that would allow me to organize my cans where they would be easily accessible. As I thought about possible solutions, I decided that the racks that Campbell's Soup was displayed in on shelf was exactly what I needed to help me organize my pantry. I figured that something like that would be easy to find. I searched high and low for something that I could purchase. I tried a number of racks, including both wire and plastic soda can organizers, but nothing worked for canned vegetables. I even contacted Campbell's directly to see if I could either order through them or if they could put me in contact with a supplier. All to no avail.

Then, one day, I found it. I found it on QVC.com (it's no longer available, but I read on to learn about a similar item I have recently found). It has plastic rails with metal connection rods. It was a little more money than I had hoped to spend, but I decided to maximize my shipping dollar and to allow for more storage, I would get two racks. This turned out to be a great idea on my part, because when I received the racks, I discovered that when you bought two you could use the enclosed connection rods to connect the two racks, creating a "third" rack between the two I had purchased. The two racks I had purchased were perfectly sized for a standard vegetable can (and canned pasta, beans, tomatoes, etc) and the additional rack created with the connection rods is the perfect size for soup cans. Actually, if I had bought the third rack, I would then be able to have five "racks". The modularity is a very nice feature.

Each rack has two sections, one inside the other, so it allows for the storage of a lot of cans. I keep vegetables in one section, beans in one, tomatoes in one and canned pasta meals in one. I have two sections for soup, which I have split between eating soups and cooking soups. It is a great organization tool. Since you load the cans from the top and remove them from the bottom, it helps to make sure that we are using the oldest product first.

I keep the rack on the floor, it is much too heavy to put on a shelf. This required me to relocate things like soda that I had previously stored on the floor of the pantry, but freed up some additional space for me on the shelves. I still struggle to keep the balance of the pantry organized, but my cans are always in order.

As I mentioned earlier, I recently found another Canned Goods Organizer - the Cansolidator. I am really excited about this line of organizers. It has added flexibility that my current organizer does not have. It comes in multiple sizes - from cupboard to pantry plus. The Pantry size accommodates different types of cans - from tuna cans to 30 oz cans (my current one only works for soup cans and vegetable cans). I am excited to let you know that I will soon be doing a review and giveaway of the Cansolidator. (I had hoped to have it in time for this post, but since it is not here yet, you will have to watch for the giveaway over the next few days.)

Organizing my cans works for me!

This post shared at Works for Me Wednesday.

Wednesday, April 28, 2010

Wonder Hanger

One of my challenges as I have lost weight is finding clothes in my closet that fit. When it comes to pants, it really is hit or miss. For whatever reason, they must have all been varying degrees of tightness when I was larger. Since they don't all fit, I have been having a wonderful time shopping for a smaller size that fits me and (hopefully) flatters the new smaller me. The problem is that my closet has been growing increasingly more stuffed. Most of my shirts, suits and slacks that I wore before I still have - I can't really go out and buy a whole new wardrobe (although does What Not to Wear take self-nominations? I'm sure I look "great" in my oversized clothing) - but now, I have begun to add to it smaller clothes. As I continue to shop, my closet is reaching capacity.

Wonder Hanger

A few weeks ago, I was contacted about checking out Wonder Hangers. You know you've seen the infomercial - "triple your closet space". I am always a little skeptical about products on infomercials (although that is how P90X is sold and I LOVE IT!), so I thought it would be a great opportunity to give it a try.

Wonder Hanger

    "The Wonder Hanger® is an affordable tool that's great for any Spring Cleaning features. This cascading clothes organizer increases closet space by enabling you to stack clothes vertically. Each Wonder Hanger holds 5 wood, metal or plastic hangers. There are 8 hangers to a package – enough to hang 40 garments. The open-mouth design allows you to easily add or remove your jackets, skirts, pants and shirts. Supporting up to 20 pounds, it can hold up to 5 heavy winter jackets.

    You can use it to group complete outfits or similar items, organize by color or season, and hang handbags or belts. It retails for $9.99 and can be purchased at major retail chains including Walmart, Target, Bed Bath and Beyond and CVS and online at www.buywonderhanger.com."

    Price online is $9.99 plus P&H (Buy one, get one free; just pay extra P&H)

    You can watch a video here.


Let me start first by sharing my concerns with the product, none of which are insurmountable, just things that I hadn't really considered that upon use I felt obligated to share.

If your closet is stuffed, you can't just decide to add a few of these to closet. First, you must remove things from your closet. The hangar, when connected on both ends to the closet rod, takes up more space than the five hangers that it holds. Not a big deal - it's probably best to start an organization project by cleaning out your closet and getting rid of what you don't wear.

The hangers may very well triple your closet space, but you can't use all of the new found space. Again, in order to get most things back off of the hanger, you need to reconnect the second end. The item on the top and bottom (or left and right depending on your perspective) you can easily remove without reconnecting, but the others are sort of held in place by the clothes around them. Again, this a bad news/good news thing - you can fit more in your closet, just not a full 3x as much.

It only works on full height closet racks. This one is probably pretty obvious but I had never considered it before trying them. With many master closets and even some other bedroom closets, to maximize space, many people have one section that is full length and one section that has a top and bottom rack. With the top and bottom rack, there just isn't the space needed to accommodate the "drop" when you disconnect the one end and collapse the hanger. The good news is you are already getting more use for your space with the double racks, but you can't increase it with the Wonder Hanger.

That being said, it really does work. You can hang your clothes on it and disconnect the one end and store more stuff in less space. I think that for me, the most effective use of these hangers will be to tuck my out of season clothes off to the side and create more space for the items that I am currently wearing. This will allow me to increase the total amount that I can store in my closet. I suspect that allowing my clothes to be looser in my closet will also help minimize wrinkling. Shoving them in like I have been lately, has made for more ironing than normal.

The ad on TV seems to illustrate with thin blouses, but I even used it for the kids coats:
I will note that when using the hanger for bulkier clothes, like coats, the hanger does take up more space as it hangs at a greater angle than it does with thinner clothes, like blouses, where it can hang closer to vertical.

Giveaway
Would you like to give Wonder Hangers a try for free?

Courtesy of Wonder Hanger and MamaBzz, I have the opportunity to give away a pack of Wonder Hangers to one A Busy Mom of Two reader.

How to enter: Leave a comment sharing what your closet organization challenge is.

Additional Entries - Please leave a separate comment for each addition entry!:
1. Subscribe to A Busy Mom of Two via RSS or email.
2. Follow me on Twitter AND tweet about this giveaway. Leave a comment with a link to your tweet. This entry can be done daily.
3. Blog about this giveaway. Leave a comment with a link to your post.
4. Promote this giveaway another way, like Facebook. Leave a comment letting me know how you promoted this giveaway.
5. Add my button to your blog. (It’s on my sidebar to the right.) Leave a comment letting me know that you added it (or that it was already there!)

This contest will remain open until May 18th at 6 pm. Winner will be selected using random.org. The winner will be contacted by e-mail (be sure to leave one!) and will have 48 hours to respond or a new winner will be selected.

No compensation was received for this post. I did receive one box of 8 Wonder Hangers, courtesy of Wonder Hanger through MamaBzz, in order that I might try the product and share my experiences.

Tuesday, April 6, 2010

Coupons

I think I have always been a couponer. I imagine it is because when I was a child, my mom was a couponer and a refunder. It was something that I always knew. It used to be that I clipped only a few coupons and kept them all in one envelope. As my life changed - school housing, apartment, house and single, married, mother - I started to clip more coupons. I needed a better system for organizing my coupons.

I started with a check file. They generally have twelve or thirteen pockets (corresponding to either the months or the alphabet, or customized with stickers) which allowed me what felt like ample categories when I started. I built the categories based on my product usage. As I have expanded my couponing, I now find myself with two files - one for my health and beauty items (which were all in one pocket before!) and one for the grocery items. I found this split to work for me because I generally only need coupons from the one file for my CVS and Walgreens adventures. The other file is used whether I am at the grocery or a supercenter.

With time, the categories that I have used to file coupons has evolved. Many of them were combined in the original file, which also at one point included a category for baby, now they have their own compartments.

Currently, the tabs that work for me are as follows:

Health and Beauty:
Hair
Body
Face
Eyes
Shaving
Deodorant
Teeth
Feminine Care
First Aid
Medicine
Nutra/Vitamins
Other


Grocery:
Bread/Cereal/Breakfast
Freezer
Deli/Dairy
Meat
Pasta/Sauce/Canned Vegetables
Sweets/Snacks/Crackers
Seasonings/Condiments
Fruits/Vegetables/Beverages
Paper/Plastic
Detergents
Cleaning
Other - Cat/Batteries/etc.

I have tried other ways to organize over the years. I tried not cutting them, but found that for me it was harder to find them when they were unclipped. Plus, it seemed bulky and difficult to work with in store.

I used to find coupons as I went at the store. Now, I generally plan my grocery store trip, pulling coupons for things that are on deal or that I know I need for the week. I sort my coupon in the order that I will use them and tuck them in an envelope. As I shop, I pull out the coupons that I use (I don't always use them all) and set them in a separate pile so I don't forget to redeem them. I still bring my coupon files along, because there are often other deals that I find while at the store and want to be prepared.

I have been asked if I clip every coupon. The answer is no. I clip coupons for the categories that I buy. I clip for many brands within those categories, but not all. I love a good deal, but I am also a brand loyalist on many things - ketchup, mayonnaise, amongst other things. As a result, if there is a brand or a category that I don't buy, I either don't clip it or if I know a friend that uses it, I clip it for them.

I have been asked how I keep my file free of expired products. I typically will go through the file every week or two and pull out any coupons that are expired or will expire that week. This allows me to use coupons that I have that haven't been on a deal but are worth using for an item that I use.

When it comes to coupons, this is what works for me.

This post shared at Works For Me Wednesday.

Wednesday, September 2, 2009

Pantry Reorganization

Last weekend, I decided to enter a $250 Pantry Makeover giveaway, unfortunately I didn't win. Fortunately, I had to submit a photo to enter and I realized what a mess my pantry had become.

My cans were well organized already, thanks to my canned goods rack, but the rest of it was a disaster. Things were simply 'shoved' in wherever they would fit. Stacks of pouch items had toppled and were covered with other things.

As I removed everything, I started to realize that by not being organized, that I had lost track of things. There were multiple partial boxes of the same item. There were things that had long since expired. There were things I needed for recipes that I had continued to buy each time I prepared and yet there those items were, buried in my pantry.

I organized using food storage containers and lining pouches up in them (by expiration date), so that I could allow for them to stay upright and to use with a more reasonable rotation. I threw out a lot of partial bags of chips and organized all of my crackers in a deep stack. We can simply eat from the front box back now. I used a couple of food storage containers to empty bags of food into so that we can more easily access and consume that product without worrying about it getting crushed or lost.

Now my pantry looks like this. I can find things and I was able to sort things so that the products to be used first were most accessible. It made menu planning this week easier, as I was able to see what I had. In fact, I created a dish (promise, I will post this soon) for dinner on Sunday to use up some odds and ends. (honest, the picture doesn't really do it justice - as I sit here, I could see you saying, really that is more organized?)

Having an organized pantry works for me.

For more tips and tricks, check out Works For Me Wednesday at We Are THAT Family.

Tuesday, September 30, 2008

Canned Goods Rack for the Pantry


When we moved into our house a few years back, the one thing that I was glad to gain was a pantry in the kitchen. At our last house, we had used a closet in our basement to store extra food items. Unfortunately, I quickly learned that the wire rack shelving that seems to be used so universally in the closets is not at all suited for holding significant numbers of cans. At least not with the configuration that I have that only has side supports due to the relatively small size of the pantry. To combat this, I found myself organizing my shelves with cans lining the three wall sides and then filling the middle with other "lighter" stuff. Unfortunately, this way of organizing resulted in me double stacking cans and made locating items more challenging. I knew there had to be a better way.

I wanted something that would allow me to organize my cans where they would be easily accessible. As I thought about possible solutions, I decided that the racks that Campbell's Soup was displayed in on shelf was exactly what I needed to help me organize my pantry. I figured that something like that would be easy to find. I searched high and low for something that I could purchase. I tried a number of racks, including both wire and plastic soda can organizers, but nothing worked for canned vegetables. I even contacted Campbell's directly to see if I could either order through them or if they could put me in contact with a supplier. All to no avail.

Then, one day, I found it. I found it on QVC.com (just checked, I can't find it there anymore). It has plastic rails with metal connection rods. It was a little more money than I had hoped to spend, but I decided to maximize my shipping dollar and to allow for more storage, I would get two racks. This turned out to be a great idea on my part, because when I received the racks, I discovered that when you bought two you could use the enclosed connection rods to connect the two racks, creating a "third" rack between the two I had purchased. The two racks I had purchased were perfectly sized for a standard vegetable can (and canned pasta, beans, tomatoes, etc) and the additional rack created with the connection rods is the perfect size for soup cans. Actually, if I had bought the third rack, I would then be able to have five "racks". The modularity is a very nice feature.

Each rack has two sections, one inside the other, so it allows for the storage of a lot of cans. I keep vegetables in one section, beans in one, tomatoes in one and canned pasta meals in one. I have two sections for soup, which I have split between eating soups and cooking soups. It is a great organization tool. Since you load the cans from the top and remove them from the bottom, it helps to make sure that we are using the oldest product first.

I keep the rack on the floor, it is much too heavy to put on a shelf. This required me to relocate things like soda that I had previously stored on the floor of the pantry, but freed up some additional space for me on the shelves. I still struggle to keep the balance of the pantry organized, but my cans are always in order.

This is one organization tool that I am glad I found.

For other Kitchen Orgnazition Solutions, check out Works For Me Wednesday Kitchen Organization Edition at Rocks in My Dryer. Find other tools to make your life easier at Toolin' Up Tuesday at Life As Mom.